Thursday, April 10, 2025

Easter Tiers of Cheer

Spring is definitely springing around here which means it's just about time to be winding down with Easter crafting! ha ha! Go figure! But, we all know how things work in the papercrafting world and there's always something new and exciting just around the corner! I took some time to clean up my desk and in doing so, I needed to either throw away all of the leftover bits or put them to good use! I had put so much time and effort into creating them, so I decided putting them to good use was the best option! So, that means I'll be sharing 4 projects over the next week or so leading up to Easter that showcase all of the leftover bits! I'm also just not quite ready to say goodbye to all of the sweet early spring things like bunnies, chicks, eggs, bulb flowers, etc.

Also, because I was pulling bits and pieces from all sorts of different past-projects, there will be quite a bit of mixing brands, so just be aware. I will link everything so you know where it comes from.

My first card uses the darling new Tiers of Cheer: Easter Stamp Set. I made 3 cards for the release using this particular stamp set so I had quite a few leftover pieces to pick and choose from. The background was from a card I was hoping to make using the Love to Layer: Scalloped Diamonds Die and turning them into kites, but I just couldn't make it work so I had this extra ink blended and splatter panel. It was actually the perfect backdrop for the tiered tray.

I had so much fun "decorating" the tray using all of the leftover pieces. I also found that the leftover florals from the  Bitty Botanicals Stamp + Stencil were the sweetest addition to the tray, tucking them in bowls, the watering can, etc. This is my favorite card using this set and I think it's because of the addition of these sweet florals.

The Easter sentiment was leftover from my projects for the Bunnies and Bows release and is from the Spring Crest Stamp Set. I also used one of the companion sentiments for the He Is Risen portion, which is stamped directly on the tray. When I spritzed the card with shimmer spray a large drop ended up on the sentiment....ugh! I can't decide if I should just leave it or fix it! I was beyond bugged but things like that happen and it's not the end of the world since I CAN stamp another one.

The bow on the aqua bunny on the bottom of the tray is from the Bows Galore Die and I just love how it looks on this cute bunny. I like it better than the stamped bow on the watering can. I had so much fun creating this card and it used quite a few of my leftover goodies. I did end up throwing away any remaining pieces from the Tiers of Cheer stamp set because there wasn't enough of anything to make another card, so unfortunately, those ended up in the trash. Join me again soon for my next card! I will be sharing them in the order I made them, not that it matters, but you will see how I started running out of things to use, but I was proud that I used almost every last little piece! ha ha! Thanks for fluttering by!


Monday, April 7, 2025

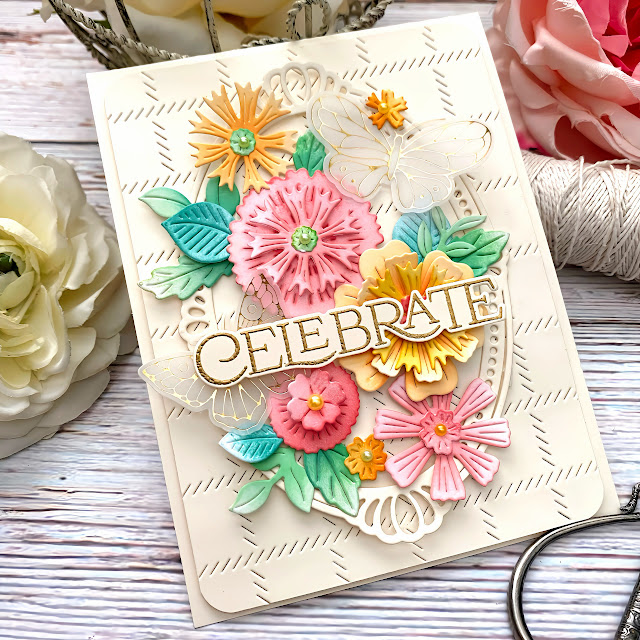
Pinkfresh Studio {Celebrate}

Welcome, friends! I finally took some time over the weekend to use a few of those products that I just "had" to have when they were released! I have a basket with things I've purchased and never used and it is absolutely BURSTING at the seams so it's time to tackle it! ha ha! I decided to take ALL of the Christmas items out since I won't be using them for a few months at least and that made it seem not so overwhelming. 

To begin this card, I used the Garden Party Layering Stencils with the Garden Party Die and created all of the fun blooms. I love how easy it is to mix and match all of the different pieces to create one-of-a-kind flowers!


I had a few butterflies left over from a past project that were made using the Small Butterflies Hot Foil Plate with gold foil and the vellum. 

For the background, I used the Diagonal Stitched Plaid Die with Vintage Cream cardstock. I cut it to 4 by 5 1/4 inches and then used a corner rounder punch for the edges to give it some added interest.

I die cut the oval using the Essentials: Ornate Oval Die and then added it to the background using small strips of foam tape.

For the sentiment, I heat embossed the CELEBRATE sentiment in gold, which is included in the Here For You Stamp Set and then used the coordinating Here For You Die to cut it out.

I layered all of the flowers and leaves in the middle of the oval frame and tucked the leaves here and there until I was satisfied with the arrangement.

The sentiment is layered over the top using foam squares. I added the entire background panel to a top-folding A2 cream card base using additional foam squares. Thanks for fluttering by!


Friday, April 4, 2025

The Miracle of Easter

Hello friends! My Easter stash is growing and I'm so excited! I'm also excited that Easter is so much later this year than it was last year so I have ample time to make special preparations! As you can see, I made two cards to share with you today using the same basic elements with different sentiments.

To begin the pair, I die cut all of the pieces for the tulips using the Into the Blooms: Tulips Die from white cardstock and then colored them using distress oxide inks and finger daubers. I used a combination of liquid glue and foam squares to assemble the blooms.

For this card I used the Thoughts of Easter Sentiments Stamp Set; I stamped the verse in black on Lilac Grace cardstock and then stamped the Rejoice! on white and die cut it using the Thoughts of Easter Sentiments Die.

The background on both cards is the same. I used the Fantastic Front: Scalloped Frame Die and cut it from white cardstock. I added it to an A2 panel of Lilac Grace cardstock using foam squares. I added the tulips to the center of the Rejoice card using foam squares and added teh sentiments.

This card features the Reflections February stamp set and the coordinating Reflections: February Die. I heat embossed the verse in white and then die cut it out. I prefer to do the embossing first so it won't warp the die cut piece.

I added the sentiment to the background panel and then arranged the tulips around the edges. Each card got a few dew drops on the leaves and tulips for a fun springtime effect. Thanks for fluttering by!


Wednesday, April 2, 2025

You Make Me Happy

Hello friends! I hope you're all doing well and I'm so glad you've stopped by! I have a bright and cheery card to share with you today that will hopefully bring some sunshine to your day!
When using stencils, I have a tendency of just creating panels with the stencil design completely covering it; for today, I decided to switch things up a bit.

I wanted to create the illusion of depth and dimension, but without any additional bulk. To begin this card, I cut an A2 panel of white cardstock (I did eventually trim it down). I added a strip of washi tape to the left side, leaving the white border as you can see. I layered the smaller of the two stencils included in the Dotted Hexagon Stencil Collection and added Harvest Gold ink centralized near the washi tape and then let it fade out. I removed the stencil and then added some Summer Sunrise ink over the top of the stencil, using a lighter hand as it fades out.

I kept the washi tape in place, but also added some post-it notes to cover the white space so I could add black and Summer Sunrise paint splatter. Once that was done, I removed the post-it notes and the washi tape and set it aside.

I had some daisies already cut out from a previous project, so I just added a little bit of Harvest Gold ink to the center of each layer as well as the centers of each flower and then glued them together with the final layer added with foam squares. The leaves are colored using Spring Moss and Ripe Avocado ink. 

I stamped the sentiment, which is from the Just Sentiments: Quotes Mini Stamp Set, in black and then added the flowers and leaves. I cut and folded a top-folding A2 card base and then added the stripes using the Show Your Stripes Stencil Collection. I cut the hexagon panel down to 3 3/4 by 5 inches and layered it over the top using foam squares. I added the daisies, sequins and shimmer spray and called it done! Thanks for fluttering by!