Saturday, January 30, 2021

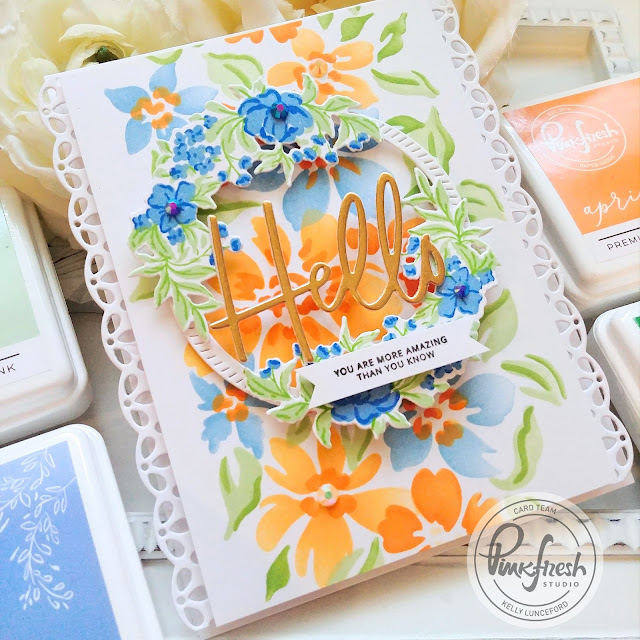
Pinkfresh Studio {You Are More Amazing Than You Know}

I shared a sneak peek of this stenciled panel on my IG Stories the other day and now I'm here today sharing how I turned that panel into this card! When I'm struggling to find a color combination to work with, I always like to head for complimentary colors, like I did here with the blue and orange! My husband is a HUGE Denver Broncos fan, so there's always a lot of blue and orange going on over here! ha ha! You can also try using lighter shades of each of the complimentary colors to give your project a softer look, like I did on this card.

As I mentioned earlier, I started this card off by using the Seamless Floral Pattern Layered Stencils onto a 5 1/2 by 4 1/4 inch piece of white cardstock. I eventually trimmed the panel, but the stencils come with guide marks to be used with those dimensions, so that's what I started off with! I used Apricot, Slumber, Clementine, Fresh Pear, and Key Lime ink for the panel. I trimmed it down on the sides; just enough to not cut off the leaves and then to 5 1/4 inches tall.

Those dimensions allowed me to add the white Lacey Edgers to either side using foam squares for dimension. I used one of the sets of holes to use as my guide to get them lined up straight on each side. I die cut the "Hello" word, using the Essentials: Classic Words die set, out of gold specialty paper and once again using white cardstock. I glued them together using a fine tip 2 way glue pen.

I didn't want to cover up the stenciled panel too much, so I opted for a circle frame and a few other flowers for added detail and dimension. I die cut the circle frame using the Essentials: Diagonal Stitched Circles and then added it to the panel using small foam squares. The extra flowers around the circle were die cut using the Charming Floral Wreath die set and then stamped using the Charming Floral Wreath stamp set. I find that with this set in particular, it is much easier to do the die cutting and THEN the stamping using the negative space as a guide to line up your images!

I added the "YOU ARE MORE AMAZING THAN YOU KNOW" sentiment, which is also from the Charming Floral Wreath stamp set, to the bottom of the circle. I always love adding some Essentials: Jewels to my projects and for this card I chose the deepest blue and light yellow! I added them to the centers of a few of the flowers using liquid glue. The entire panel was added to a top folding A2 card base using foam squares. This would be a perfect thank you card, even though it doesn't come right out and say that, or just a "hello" card to an amazing friend! Thanks for fluttering by!


Friday, January 29, 2021

The Greetery {Sending S'more Hugs and Kisses}


Ahhhhh....the end of the month....a time to sit back and relax and do some "just because" crafting! Today I'm putting a Valentine's Day twist on one of my favorite cards from The Greetery. I fell head over heels in love with it when I first saw it in this post. It is the "Let it Snow S'more" card all done up in blue and brown! 
I changed the snowflakes to cookies, which were created using the Hug in a Mug Sweet Treats Die set, and rectangular grahams, to heart shaped ones! Oh...and of course, the mallows are pink!

I did, however, omit the cute frame that Betsy added around hers, because I didn't want the heart shaped grahams to get lost underneath it. In hindsight, I think I probably should have added it.
To begin, I created the Linzer heart cookies by die cutting the top and bottom of the cookie out of Rustic Cream cardstock and the center portion from red cardstock. I glued the red circular center to the bottom portion of the cookie and then added Nuvo Crystal Glaze over the top and sprinkled the sugary glitter from the Hug In a Mug Embellishment kit, which was discontinued after it sold out. I added some small foam squares to sandwich the top and bottom pieces together and set them aside to dry.

Next came the grahams and the chocolate pieces. . I used the Graham Cracker Cuts to die cut two panels of grahams and then die cut the hearts from the panels using the smallest hearts in the Shapely Hearts Die set. I die cut just some plain Kraft hearts so I could layer the graham cracker ones on top of the solid heart so the holes wouldn't show through. The chocolate was cut from brown Fun Foam using the Hug in a Mug Sweet Treats die set and then glued together using liquid glue. After all of those pieces were created, it was time to work on the sentiments and mallows!


I die cut the S'more word and the twig/mallow pieces using the S'more Holiday Die and then stamped them using the coordinating S'more Holiday Stamp Set.  I carefully stamped the "hugs and kisses" portion of the sentiment using the Sentiment Suite Love stamp set using Versamark ink and then embossed it with my favorite White Embossing Powder. I used a Post-It Note to cover up the portion that I didn't want while I was inking it up and then removed the note to stamp it. I die cut it using the Sentiment Suite Basics die to give it the pierced detail on the notched ends. I just love how nice it looks.

 
I added some pink and red ink blending to the top of a white 4 1/4 by 5 1/2 inch panel and then added some red ink splatter. Once that was done, I was ready to add all of the fun elements I had created! The finishing touch is a bit of chocolate shavings from the embellishment kit glued to the chocolate pieces. 
I had an extra marshmallow branch and a chocolate piece made from regular cardstock, so I added those to the inside and S'more sentiments! ha ha! I used the smaller "S'more" sentiment for the inside with the other two I used on the front. If you're a CAS type card maker, this would actually fit the bill perfectly!
 I had a lot of fun working on this Valentine's Day card! Thanks for fluttering by!


Thursday, January 28, 2021

Pinkfresh Studio {You are Remarkable}

I'm not quite sure why it took me so long, but I recently joined the Pinkfresh Studio Fan Page on Facebook! There is an exclusive Inspiration Challenge for members there each month, and this is my card for the challenge! While I'm not entering because I'm on the design team, I always enjoy participating in inspiration challenges because they get me thinking differently and reaching for products I don't often go for! 

I was actually thrilled because it gave me the chance to use the recently released Hanging Garden Layered Stencils that I haven't used yet! I absolutely love these so don't be surprised if you see more from me using these! I inked them up using Fresh Pear, Meadow, Olive, Apricot, and Coral Reef ink to fit the color parameters of the challenge. Honestly, you don't HAVE to use those colors, but rather go where the inspiration takes you, but these are some of my favorites, so I went with it!

Once I had the stenciled portion finished, I die cut the YOU portion using the Heather Uppercase die set. I added ink over the top part of the letters using Coral Reef and Passion Fruit inks for an Ombre effect! 

Now, I had a furnace repairman in the basement with me while I was making this card, so I felt anxious, which may be why the "YOU" letters are too close to the "You are remarkable" portion of the sentiment (LOL!) I actually made two cards and remedied that problem on the second card, but ended up taking pictures of this one (face palm). All I need to do is remove the letters carefully and place them just a bit higher and all will be well! ha ha! 

If I were to make this card again, however, I would simply stamp the "You are remarkable" sentiment, which is from the Thankful for Friends stamp set, closer to the bottom of the frame. Oh well...what's a girl going to do?!

The frame is die cut using the Essentials: Pretty Frames die set and then I added some Olive ink around the top portion, letting it fade out around the bottom. I wanted it to fade away, just like the color on the letters. I placed it over the top of the stenciled panel using foam squares and then mounted that onto a top folding white A2 card base.
I had some flowers and leaves left over from THIS card, so I added them to the "O" and to the stenciled portion.  I added some Essentials: Jewels here and there for some sparkle and shine as well as a sprinkling of glitter! I hope you'll come join us on the Facebook page and participate in the challenge! You still have a few days! Thanks for fluttering by!

Wednesday, January 27, 2021

Hugs {From all of Us}


Hello and welcome, friends! I'm sharing a bright and colorful card today with some fun new products from the Hearts and Roses Collection by Waffle Flower! There are so many fun products and I'm hoping to share a few more projects with you before the month is over! This card was so fun to make and would you believe it if I told you it was made from 100 percent white cardstock with the exception of the black sentiment strip?


To begin this design, I die cut the frame using the Heart and Frame Die and added some red ink over the top using a blender brush. I then trimmed a piece of white cardstock to place in the center of the frame so I could add the fun "HUGS" pieces. 

These are also included in the Heart Frame Die and I die cut it 6 times. I'm going to tell you how I SHOULD have made this card, not how I actually did, because it will save you some time! LOL! I had originally only planned on using the outer portion of the HUGS piece with the stitched detail, but once I saw how cute the colorful letters looked popped back inside the negative space, my entire card design took a turn!

I used 5 different inks to ink up each of the rectangles. You'll want to leave the letters intact if you can. (I had punched them out because I didn't know I would be inking them). By inking up the entire piece, you'll be left with all the different colored letters that you'll need to assemble the card. I had to go back in and do them one at a time, which was therapeutic, but a time sucker! ha ha! I had fun putting them back into place using liquid glue. It was like putting a puzzle together where you already know where the pieces go! LOL!

The 6th set of letters will need to be left white so you can color them the exact same as the first set on the lightest pink panel. I layered these twice so I could add the Nuvo Crystal Glaze over the top easily. I only did it on those select letters and then added the heat embossed "From All Of Us" sentiment, which is from the new Happy Birthday Combo, underneath to place emphasis there. I used my favorite White Embossing Powder on this sentiment to get a nice result. I'm obsessed with the big Happy Birthday sentiments included in that set, so don't be surprised if you see one of those on a card in the next few days! ha ha!
I added another sentiment to the inside using the Sending Love Sentiments for some added detail and well-wishes!
This was a really fun card to make and is already going to a family that has COVID running rampant through their house! UGH! I'll be sharing some fresh floral inspiration tomorrow! Thanks for fluttering by!

Tuesday, January 26, 2021

Pinkfresh Studio {LOVE-you are simply splendid}

I'm thrilled to be over on the Pinkfresh Studio Blog today sharing this little whisper of Spring! I'm so happy it's finally been snowing, but for those of you who are wishing for Spring, this one is for you! I chose a cool color palette which is so typical of Spring; from Robin's Egg Blue, to shades of Lilac and Lavender, this card was a joy to create!

This is one of those card designs that I already had been putting together in my mind, so all I needed to do was create all of the different design elements and put the idea in motion! To begin, I die cut the small wreath from the Leafy Wreath Die Set 8 times from white cardstock and then added Fresh Pear ink to 4 of the wreaths and Grassy Knoll ink to the 4 remaining wreaths. I also added some Grassy Knoll ink splatter to the wreaths and then glued them together using liquid glue. 

While those were drying, I die cut the flowers using the Lovely Blossoms Dies. I picked a few of my favorites rather than die cutting all of the flowers. I used my mini MISTI to do all of the stamping using the Lovely Blossoms stamp set.  I maximized my time and put all of the leaves into the MISTI at the same time and started with Fresh Pear ink. Once that was done, I put both the leaves AND the stems of the flowers in with Grassy Knoll ink. All that was left at that point was to add the different colors to the flowers! It really  made great use of my time and I was able to get them stamped lickety split!

Next came the letters which are die cut using the Heather Uppercase die set. I really wanted these to look like speckled eggs, so I added some Ocean Breeze ink over the top of the white letters and then added Mermaid Cove ink splatter.

The background was created by die cutting the Essentials: Diagonal Stitched Plaid die from a panel of white cardstock and then again using the Ornate Banner Die Set. I added some Ocean Breeze ink around the edges for a hint of color. I also created a frame to go over the top of that by using two of the pieces from the Ornate Banner Die set. They just nest inside of each other so you can create a frame. I added the darker Mermaid Cove ink around the edge and added it to the background piece using liquid glue. 

That entire background banner is adhered to a top folding A2 card base using foam squares. Once that was done, I was able to add all of the different design elements using foam squares. The "You are simply splendid" sentiment, which is stamped in black, is from one of my favorite stamp sets called Modern Layered Floral. You could easily make this into a Valentine's Day card by using traditional red and pink with lots of pretty blooms! 
Thanks for fluttering by!


Monday, January 25, 2021

Papertrey Ink/Ink to Paper Flash Sale {Balloon Wishes}

Happy Monday! I hope you all had a great weekend! Mine was busy, but it snowed, so I'm super excited! I'm hoping that this week will be a little bit more relaxed so I can snuggle in and enjoy the snow with a fire and a good show or read a good book! I'm in desperate need of  little "down time"! This week's Ink to Paper/Papertrey Ink Flash sale features some bright, fun colors and the Balloon Wishes stamp set. The sale begins when the Papertrey Ink Newsletter is sent out, which is usually sometime this afternoon and the sale will run until Wednesday! This week's sale will include:

 INK: Tropical Teal, Pure Poppy, Aqua Mist

CARDSTOCK: Pure Poppy, Kraft (not 100 percent sure about this, since it's a basic)


These cards were so quick and easy to put together, but I love how they turned out! To begin, I die cut the Border Bling: Lots of Dots from Kraft cardstock and mounted the red cardstock that has been stamped with the balloon strings included in the Balloon Wishes stamp set. There are coordinating dies, but I just wanted a simple, stamped string for easy and to keep the background uncluttered since I used the "Celebrate" word.

I die cut 6 balloons in total; three heart shape and three of the regular balloon shape. I also die cut 6 bows for each of the six balloons. I used the coordinating stamp to stamp the 6 bows in the three colors I used for the balloons; Aqua Mist, Pure Poppy, and Tropical Teal.

There are striped images in the stamp set so you can create striped balloons, but I chose to do some simple ink blending around the perimeter of each balloon, leaving the center light to give them that realistic balloon shine!

Once the balloons were all inked up, I added the coordinating bow using a dot of liquid glue to secure them in place. I set them aside to dry and got to work on the sentiments.

I die cut the "Celebrate" word using a titanium glitter paper and then adhered them to the red panel using strategically placed liquid glue, making sure to leave it off of the parts that aren't actually touching the red panel.

For this card, I used two regular balloon shapes and one heart shaped balloon in the center. I added double thick foam squares to the heart shaped one to make it pop up higher than the two balloons in the background!

I added a trio of sequins to the balloons. I thought about using glitter, but I didn't want it to compete with the glitter from the sentiment.

For this card, I placed the two heart balloons in front of the red balloon so you could see their cute shape. These were so quick and easy to put together, but I really like how they turned out! Thanks for fluttering by!


Saturday, January 23, 2021

Pinkfresh Studio January 2020 Challenge {Live Life in Full Bloom}


It's the weekend! Yay! Things have been pretty busy around here with two releases and a few extra projects that I've been needing to get done! The month has slipped away from me, but before it's gone completely, I wanted to make a few cards for this month's Pinkfresh Studio January 2021 Challenge! The fun thing about this particular challenge is that you can pick ANY of the challenges from 2020! I chose to use the inspiration from the November 2020 challenge, with the photo posted below!


I actually made two versions of this card, with the second version at the end of this post. They are almost identical, the only difference being the color of the Leafy Wreath, which I will talk about later. To begin both cards, I used the Diamond Plaid Stencil Set with the first layer being inked up using Lavender ink and the second layer using Regal Kiss ink for a dramatic effect. In the end, the purple turned out to have more pink in it than the inspiration photo color swatches, but I liked how it turned out so I just went with it!

Once the backgrounds were finished, I used the Essentials: Stitched Rectangles die set to add the finished detail around the perimeter of each of the panels. I haven't ever used these particular dies, so it was fun to switch things up a bit! Sometimes I get stuck in a rut and just reach for the same things because I like the end result, but it was nice to try something new.

My next step was to create the pretty Mermaid Cove and Tidal Pond flowers. I think that's what I was most excited about in the inspiration photo, especially paired with the dark blue. I've really been enjoying using bold color combinations, rather than the pastels I usually reach for. The flowers were created by first die cutting them using the Charming Floral Wreath die set. I cut two for each of the cards for a total of 4. Once that was done, I used my Mini MISTI Stamping Tool to stamp the leaves and flowers using the Charming Floral Wreath Stamp Set. I haven't used this set since it was first released, so it was fun to use it again. I don't know why I haven't used it more!

The leaves are stamped in Olive ink and then the flowers are stamped in Mermaid Cove and Tidal Pond ink. I die cut the a white circle using the Essentials: Diagonal Stitched Circles and then stamped the sentiments, which is from one of my FAVORITE stamp sets, Layered Bouquet, using Stargazer ink. 

I die cut the beautiful Leafy Wreath out of Dark Indigo cardstock and one out of white, which I used on my second card. I really love the dramatic contrast between the plaid background and this intricate, bold wreath!

Once I had all of the main focal images and background ready to go, I got to work assembling the cards. I mounted the stenciled plaid background onto a top folding A2 card base using 1/4 inch ScorTape. My order arrived so I was super happy to have it back in my drawer! It's never fun to run out of the essentials! I added the Leafy Wreath to the die cut circle using foam squares as well as the two floral pieces.

This is the alternative version, with the difference being that this Leafy Wreath is die cut from white cardstock with Stargazer ink over the top. I love both versions for different reasons and can't pick a favorite. Which one do you prefer?

Both cards have a "Gilver" glitter BOW {of course} which is hot glued to the top for security. I didn't use any yellow that was represented in the inspiration photo, so this is my bit of "yellow", if you can call it that! ha ha! I added a few Essentials: Jewels in both the Mermaid Cover color and the darker sapphire color. I hope you get a chance to play along with this month's challenge, especially because there are so many different inspiration options! I had a lot of fun picking which one to use! Thanks for fluttering by!


Friday, January 22, 2021

The Greetery T.G.I.F {with all my heart}

Well friends, we've almost made it to the weekend! I'm SO ready for it! How about you? It's my turn for this week's T.G.I.F {The Greetery's Inspiration Friday} over on The Greetery Blog, but I wanted to share my project here as well! I've never had my assigned week be this close to a release, so it was fun to use some of the new products in a different way and to also give you some fresh inspiration for when your packages start arriving!
This project is simple and sweet; just perfect for Valentine's Day! I don't know about you, but I like to give Valentines to MANY people in my life, not just my husband! It's the day of LOVE and there are so many people in my life that deserve a little love!
This project consists of a stamped muslin bag and a little tag to go with it. I made THIS project back in July using these stamped muslin bags. They are so much fun! You could also make a little crate to put these Valentines in, like I did for that project!

To begin, I used the Speed Tagging Christmas Rubber stamp to stamp the red gingham portion of the tags. I just adore gingham and flowers for Valentine's Day, so I was super happy that I could use this particular tag for today's project. I only inked up this particular stamp, although I could have stamped the whole thing and gotten a head start on Christmas! ha ha! Anyway, I just did this part and then used the Speed Tagging Die to cut them out. I made three in total, but I'm only showing two.
Once the tag base was made, I used the new Mini Boxwood Heart Stamp + Cut Combo to create the heart frames and for the sweet sentiment in the center. I just love the fonts for the sentiments and the cute size of the wreath!

I set the wreaths aside and got to work creating the little flowers using the new BotaniCuts Forget-Me-Nots dies. These have sold out, unfortunately, but Betsy has already put in a re-order so they should be back in stock quickly! They are SO cute, so I can see why they flew off the shelf! I decided to make my flowers pink blooms instead of actual Forget-Me-Nots. I created them exactly like I did for THIS card. Once the flowers were made, I got to work assembling the tags. I stamped the sentiment directly into the middle using black ink and then added the wreath over the top using foam squares. The flowers are attached using additional foam squares. I added some glitter to both the flowers and the wreath for some sparkle and shine!

To stamp the bags, I used my iron with steam to get them nice and crisp so they would lay flat in my mini MISTI. Once they were ironed and cooled, I placed the flattened bag into the MISTI, positioned the sentiment, which is from the new Lovely Blossoms stamp set, and then stamped it a few times in black to get a nice, crisp impression.
I put some Ghirardelli chocolate and caramel hearts into the bag and then tied them up with the tag! These are going into a larger printed box with some other fun gifts to give to a few friends. You could also fill the bag with a gift card, lotion and lip gloss, or any other small gift! These were so much fun to create! Thanks for fluttering by!