Monday, August 31, 2020

Flash Sale {Ghosts and Ghoulies}

It's Monday which means there's a brand-new Flash Sale from Papertrey Ink/Ink to Paper beginning at 12 noon EDT! Today I'm getting in the Halloween spirit with two cards using one of my favorite color combinations for Halloween and some fun stamps and dies, too! The sale begins at 12 noon today EDT and ends on Wednesday at 12 noon EDT. 


I had a lot of fun putting these Halloween cards together; from the stenciled background to the playful ghosts and the cheesecloth in the background!

To begin both cards, I cut two panels measuring 4 by 5 1/4 inches out of Lilac Grace and Plum Pudding cardstock. I used a craft stencil to add some Plum Pudding ink to the lighter panel and Royal Velvet ink to the darker panel using a blender brush. Once that was done, I added the Nuvo Moonstone Glimmer Paste over the top to give the polka dots some shimmer and shine! I loved the raised detail it gives the panel as well! I felt the polka dots played off the ghosts' expressions nicely!

I die cut all of the ghosts, bows, and speech bubbles out of white cardstock and then stamped everything using my mini MISTI. Since I was making 2, it really made things easy!

I stamped the "Happy  Halloween" sentiment in black onto a strip of Royal Velvet cardstock to bring in more of this particular shade. It's so rich and really helped me to ground the cards.

I stamped and heat embossed the spider web image onto a small rectangle of black cardstock. I adhered the white and the black panel together at a wonky angle using foam squares. I also attached the snippets of cheesecloth to the back pulling it here and there until I got the desired look.

Mr. Ghost is wearing a dapper bow-tie and Mrs. Ghost is sporting her Lilac Grace bow. The eyes and mouth images got a little extra detail with a bit of Crystal Glaze to make them shine! I also added a few sparkling clear sequins here and there! Thanks for fluttering by!


Saturday, August 29, 2020

Sunny Studio Stamps {You're on my nice list}

Hello and welcome! I'm doing a guest post for Sunny Studio Stamps on their BLOG today using some of the holiday stamps from their latest release! I thought I'd share my projects here as well, so thanks for joining me!  I love all things Santa, so the new North Pole stamp set with both Santa AND Mrs. Claus is just up my alley! 

I paired it with the fun and versatile Winter Scenes stamps to really bring this holiday card to life! The background is created using Tumbled Glass and Faded Jeans Distress Oxide ink for a winter-y looking sky! I also added some white paint splatter for a snowy look.

The images are all stamped in black and then colored with an assortment of alcohol markers. I added some coarse crystal glitter to the tops of the trees, the rooftops, and snowdrifts. Of course I just HAD to add a few of the cute accessories included in the set, like the North Pole, the gift and Santa's "nice list". The sentiment at the top works perfectly with this little addition.

The entire panel is added to an A2 cardbase with a panel of Classic Gingham Pattern Paper for just a hint of added detail. I added a dot of Crystal Glaze to Mrs. Claus's glasses and the top of the North Pole. A few sparkling clear sequins finish off this holiday scene.

As I was coloring the Winter Scene panel for my first card, I realized how perfectly it would work for a tag. I colored another scene and then cut it in half to create the backdrop for these two tags.

Mrs. Claus is offering a plate of cookies sprinkled with a touch of glitter. I feel like this sentiment is perfect for this tag and will be perfect to add to a package of homemade holiday treats!

Santa is sporting his "all important" list again, so I had to use the "You're on my nice list" sentiment once again. For those of you who aren't tag makers, per say, these tag designs would be perfect of add to a card base for a fun holiday card as well!

My last card for today uses the cute and playful elves from the North Pole stamp set. I inked up each of the 4 elves twice and colored them exactly the same for ease and speed. I did very simple coloring since there are so many elves.

Once they were die cut, I added them to the gingham background in a way that you might see a pattern on wrapping paper. I added them using foam squares in the arrangement that I liked, adding the punny sentiment at the top.

Once the elves were in place, I cut the edges using my paper trimmer making little hats and feet go flying! LOL! I actually put those little snippets to good use and added them in to the design here and there. I also added in a few packages and North Pole images to fill in the gaps.

The White Nuvo Drops are added here and there for some added detail. The elves' jingle bells and the tops of the North Pole all have some Crystal Glaze over the top for added shine and detail. The entire panel is added to a top folding A2 card base using a tape runner. I feel honored to have been asked to do this guest design project! Thank you Sunny Studio Stamps! Thanks for fluttering by!


Friday, August 28, 2020

The Greetery Gathered Blessings Release Day


Autumn is a second spring when every leaf is a flower~ Albert Camus

Happy release day, friends! It's the most wonderful day of the month! All of the fabulous products from the Gathered Blessings release from The Greetery go on sale today at 10 AM EST! I've used a few of my favorites on this card to share with you today! Since the release isn't actually "live", I don't have links to share with you for each new product, but you can find everything HERE once it goes live!  I want to thank each of you for your sweet comments you've left for me the past two days! I enjoy reading which products you're especially loving!

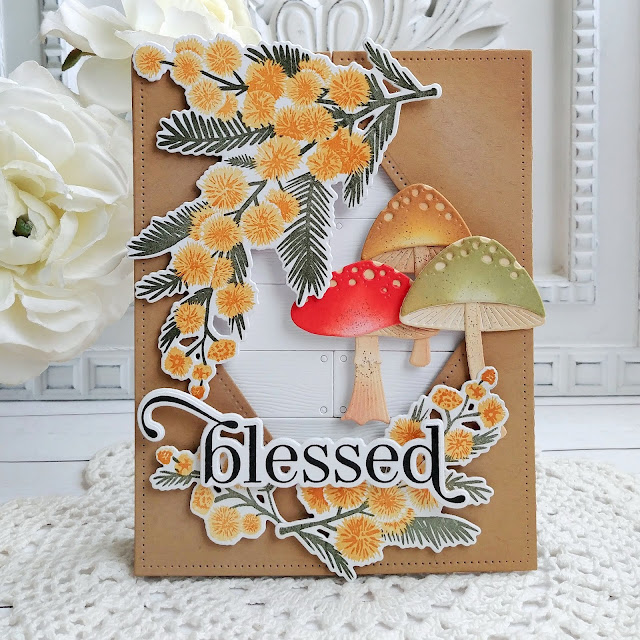
For my release projects, I went for a very traditional autumn look, but after seeing some of Betsy's fabulous color combinations, I wanted to try a few of my own autumn favorites!  This card uses the new Mimosa Musings, but this time stamped in Picked Rapberry Distress Oxide ink for another fun look. I actually googled Mimosa trees before I made my sample yesterday. I noticed that there is both yellow and pink, so I thought I'd better give the pink a try! That being said, the sky is the limit with colors you can use....that's what's so great about stamping!


The Mighty Oak and Toadstool Garden BotaniCuts play so nicely together! They're a match made in heaven! I chose to keep the toadstools and leaves cohesive in colors to pull everything together! Of course the coarse crystal glitter makes them look even more amazing! I love that the lighter portion on the center of the pink leaves makes them almost look like sparkles!

I also wanted to branch out with the shiplap background. Betsy did some amazing things that inspired me to get a little bit more creative with mine. I decided to start off with Soft Stone cardstock from PTI and then added the Weathered Wood Distress Oxide ink around the edges. It took 3 passes of the die cut machine to get enough planks for this background since they are placed on the diagonal. I was able to use the extra pieces that I trimmed from the edges to fill in the gaps on the sides.

The sentiments are both from the new Blessed Blooms that will be released today as well. These are so beautiful and I just love the font! I chose to use Soft Stone cardstock for these as well so they wouldn't be too stark.

This card was a joy to create and I loved inking these BotaniCuts up in some beautiful autumn colors! Now that school has started, I guess fall can come! LOL! How about you? Are you ready for fall? 
Thanks for fluttering by!


Thursday, August 27, 2020

The Greetery Gathered Blessings Release Day 2


Welcome back for day 2 of The Greetery Gathered Blessings release countdown! If you loved yesterday's reveals, then you'll love what is in store for you today! I'm smitten with everything and can't wait to make even more projects using these fabulous products! I have three projects to share with you today, but as with yesterday, make sure to leave a comment here for a chance to win a $50 gift certificate to The Greetery shop! Also, the rest of the designers have created amazing projects you won't want to miss!


This first card uses quite a few of the new products that work so well together! These amazing floral images are from the Mimosa Musings stamp set! They are so much fun to stamp and are so easy to use!


The new Toadstool Botanicuts are the BEST....so much fun, so adorable, and I can't wait to try them in even more colors! There's never enough time before the release to get all of my ideas executed! That's what I love about stamps and dies....they never run out...you can keep on creating and creating.

The sentiment is from the new Blessed Blooms that I will be showcasing on my next project!  It is in the same style as Birthday Blooms stamp set , which is a fan favorite!

I used the Shiplap builder again for this background because it just so much fun! The toadstools were colored using Distress Oxide inks and a sponge dauber. I also added a little bit of ink splatter using my color spritzing tool. 

Here is my card using the new Blessed Blooms paired with the Square Dance die and stencil that was showcased yesterday. I am having so much fun with it and I can see it being used year round!

After I was done, my card totally reminded me of a Bath and Body Works sack, store, and their Gingham fragrance! LOL!

I love how crisp and clean these sentiments are....they really look so professional!

I couldn't resist adding a few Nuvo drops around the foliage and flowers for some added detail.


This entire design started off using just white cardstock and I just used the stencils, ink blending and stamps to bring it to life!

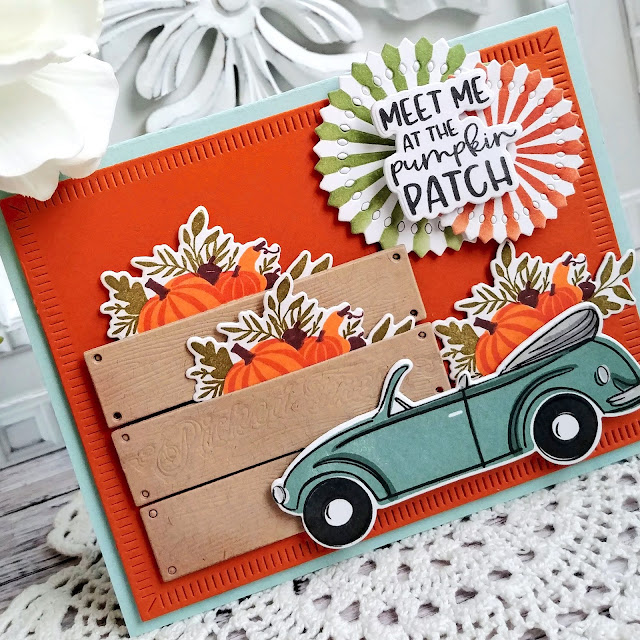
My last card pairs the Top Down Day Autumn stamp set and the new Mighty Oak Botanicuts! These are SO much fun to work with and you can color them any way you like!

I would love cruising down a country lane to a charming pumpkin patch in this convertible! How about you? I really love this particular sentiment that comes with the Top Down Day Autumn set!

I added some coarse crystal glitter to the edges of the leaves and acorns as well as the pumpkin image in the car.

These Botanicuts all started off with white cardstock as well and I used different Distress Oxide inks to bring them to life!

Thanks for joining me today for day 2 of the countdown! Everything will go on sale tomorrow at 10 am EDT, so set your alarms! Thanks for fluttering by!
 

Wednesday, August 26, 2020

Pinkfresh Studio {Tomorrow will be a better day}

Happy Wednesday, friends! We're halfway done with the week and today I'm sharing some fresh inspiration on the Pinkfresh blog and here as well, using some of the new products from the latest Pinkfresh Studio release! I always like to pull in some of my older favorites, too!

I had created a beautiful green background using the Color Block: Graditating Stripes stamp that I just loved. I DROPPED  a stamp right on top of it and ruined it! Ugh! I was so sad, but pressed forward and created this emboss resist background using the equally lovely Sweet Blooms background. 

One of my favorite new floral stamps from this last release is this large image from the Sending Love and Hugs stamp set. I really love the large size that allowed me to stamp the "Tomorrow will be a better day" sentiment directly on top using black ink!

The heat embossed sentiment pairs perfectly with it and is another Anne of Green Gables reference that I love! Ha ha! Who knew this would be such an "Anne" week? I could use this reassurance after my stamp dropping mistake!

This was such a fun card to make and I think we could all use this reminder! Hugs, my friends, and have a fabulous rest of your week! Thanks for fluttering by!
 

The Greetery Gathered Blessings Release Day 1

Hello and welcome! I'm so excited to be sharing my projects for day 1 of the Gathered Blessings release from The Greetery! As always, there will be an official "meet and greet" over on The Greetery Blog, linked below! I've got a few projects to share with you using the amazing new products that are perfect for you autumn crafting and beyond! Don't forget to stop by the other designers' blogs to see what creative ways they have used today's products! Also, don't forget to leave a comment here for a chance to win a $50 gift certificate to The Greetery Shop!
Kelly Lunceford (you are here)

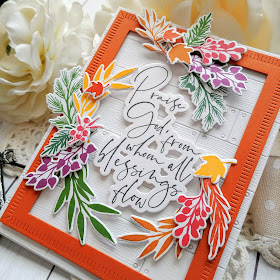
This first card uses the new "All Blessings Flow" stamp set and the new Shiplap  Builder die collection! If you loved what could be done with the Create-a-Crate die, then you will love this genius collection even more! This is a set of six identical dies, a bit smaller than the panel in the crate die set, that you can use to create a background like mine in no time!

The foliage and berries from the new All Blessings Flow stamp set are perfect for creating arrangements of all kinds; in the jars, bottles, cans, etc. I decided to use them in clusters to frame this gorgeous scripted sentiment included in the set.

I'm always thrilled when there is a coordinating die for the sentiments. This allowed the fun background to really shine through!

This next set of products checks all of my "must-have for fall" boxes. First up is the GORGEOUS bittersweet branches. The sentiments are also included in this set and I can't get enough of the scripted "autumn" ! 

The pitcher is from the new Pitcher-esque stamp set. It also has a coordinating floral image that you can use to adorn the pitcher, but I didn't use it for today's projects since I was accenting them with the sentiments. The little floral piece has such a fun nostalgic feel to it that I can't wait to use it on some everyday projects!

And as always, there is a fabulous new set of stencils and a coordinating die called "Square Dance". That is how I created this fun gingham bacgkround!

The Cozy Cup Coaster Die is the perfect grounding piece for these pitchers. I love the added texture and detail that it adds to this design.

I couldn't resist making the same card but with a different color pitcher and background. I kept the two cards cohesive, but different.


I know I say it every time, but once I have these multi step stamps set up in my MISTI, it just makes sense to make multiples.


Both of these two cards using the Bittersweet branch were such a joy to make! I absolutely love when I start seeing these change colors around town~

Last, but not least, is the newest arrival in the "Top Down Day" collection! This one is called "Top Down Day Autumn" and is just the sweetest little collection of stamps and dies. If you're not familiar with the first in the series, you can see it HERE.

I used the Shiplap Builder dies to create a pumpkin stand, like you might find at a pumpkin patch just bursting with the day's harvest! I used the "Picked Fresh" embossing piece from the Create-a-Crate die that was released last month to accent this pumpkin stand!


I used the ever-popular Pinwheel Party Bundle to give this pumpkin stand a little bit of a festive touch! The sentiment is die cut and added over the top of the pinwheels to balance them out! I hope you've enjoyed day 1. Don't forget to stop by for day 2 tomorrow....you won't be disappointed! Thanks for fluttering by!