Thursday, January 31, 2019

Throwback Thursday {Wishes Come True}

Hello and welcome to this week's Papertrey Ink Throwback Thursday! Today a few of us are revisiting the Wishes Come True stamp set and the coordinating Wishes Come True dies. Nothing says "birthday" more than cake and candles! Today I've created a paper cake and added the stamped candles for a festive, yet elegant birthday card! I've been sending out a TON of cards recently, so I'm pleased to get a birthday card back in the stash! I've grown weary of looking at some that I have had for a while now, so I took out a huge stack, wrote out cards to anyone who I could think could use a little happy mail, and mailed those babies out!  I plan on mailing them out a little bit more regularly to keep things fresh and rotated! 
For today's card, I knew that I wanted to create a stacked cake adorned with flowers and candles. To begin, I die cut the two "layers" using the Nesting Basics: Pierced Rectangles and the Nesting Basics: Rectangles Dies out of Lilac Grace cardstock. This particular shade of paper is at the bottom of my paper racks and it has been woefully neglected! You can look forward to more Lilac Grace in the future; it is absolutely beautiful! I added a strip of ScorTape to the bottom of the two rectangles, removed the backing and added some glitter for a fun border. Most professional cakes have some piped icing, a bow, or some type of visual interest, so that is why I added the glitter! I really like how it looks with the Lilac Grace.

Once that was done, I got to work on the flowers. I used Farmer's Market Florals to create all of the flowers for the cake. I die cut them using the Farmer's Market Florals dies and then got to work stamping them. I used my Mini MISTI so that I could get them done lickety split!  The ink colors are Lilac Grace, Winter Wisteria, Royal Velvet, Sweet Blush, Pale Peony, Hibiscus Burst, Harvest Gold, Simply Chartreuse, and Ripe Avocado. 


 The background was created by dry embossing the Bold Borders: Polka Dot using Winter Wisteria cardstock. This set the stage for me to add the rectangles to form the cake as well as add all of the flowers to decorate it.
The candles are stamped in the same colors as the flowers for cohesion. I added a small sparkling clear sequin to the "flame" of each candle for additional sparkle. 


I love, love, love all of the sentiments in the Wishes Come True stamp set! I stamped the sentiment in black onto a strip of white cardstock and attached it to the cake using foam squares. After I photographed it, I spritzed it with Shimmer Spray. I find that if I do it before, the sparkles show up in the photos in a distracting way, but in real life it looks AMAZING! Thanks for fluttering by!


Inspired By #57 {Just my Type}


Hello, friends! It's Thursday and that means that there is another awesome Inspired By Challenge for you to play along with! If you haven't started your Valentine's Day cards yet, or if you're just finishing up, this is the challenge for you! It is chock full of Valentine-y goodness that is sure to spark your creativity!
I just love all of these different home decor signs that really get the creative juices flowing! For my design, I chose to use the framed piece with all of the red hearts. I also used the vintage-y inspiration from the bike piece and added in the typewriter. I almost just made a bike card, but that felt just a hair too literal! ha ha!

 To begin, I grabbed a 6 by 6 paper pad of vintage inspired papers and got to work punching out an assortment of hearts. I punched enough to make three rows of 4 hearts double thick. Once I had them arranged how I wanted, I used a ruler to make pencil lines on a piece of scripted paper from the same pad so that I could arrange them in a straight line as well as sew them that way! LOL! I used a 2 way glue pen for the bottom heart, making sure I didn't put any glue near the center; I didn't want to gum up my needle. I began sewing in the "needle down" position so that I could arrange the heart perfectly on top. The presser foot moved the top heart out of place since it wasn't glued down, but I simply lifted the presser foot with the needle down and then arranged the heart. I did this row by row until I was finished. I really like how it turned out.
Once they were all stitched, I "fluffed" the top heart up so that it gives the card the dimension I was hoping for. I trimmed the long threads, but kept the tails for some added detail. I'm kind of obsessed with these cute little vintage hearts, so don't be surprised if they make their encore performance before the 14th rolls around! LOL!


 I stamped the "Happy Valentine's Day" sentiment along the edge using black ink. I just love the vintage font! It pairs so well with the papers that I chose for today's design! The typed piece that is coming from the typewriter is from the newly released Vintage Type stamp set. There are a lot of words embedded in the text, so I chose to use a piece that had "love" on it. I used my color spritzing tool to add some black splatters across the top for some added interest.
 I adhered the typewriter using a double thickness of foam squares so that the hearts wouldn't lose too much dimension. I also added a few sparkling rhinestones here and there for some added shine. I also added a few squirts of shimmer spray over the top for a hint of sparkle. I plan on giving this card, along with some goodies, to my sons' computer teacher. She always seems so pleasantly surprised when I bring seasonal treats and gifts to her. I think the "specialist" teachers have a tendency to get forgotten. 
This card was such a joy to create; I had so much fun with the papers, the sewing and overall vintage feel. I used to make vintage cards ALL the time, so it is nice to revisit that style every once in a while.  I hope you get a chance to join us this week over at Inspired By! Thanks for fluttering by!

Friday, January 25, 2019

Papertrey Ink Design Team Tips: Postage Stamp Inspiration


Hello and welcome to this installment of the Papertrey Ink Design Team Tips! I'm really excited to share my projects with you today! As a paper crafter and card maker, I really enjoy sending snail mail! I love to coordinate my postage stamps with the cards that I send! I decided to switch things around for today's Design Team Tips and create a series of cards that match the postage stamps! As soon as I saw the Love die that was released last year, I've had this idea in the back of my head! I've created three different cards based on postage stamps, so make sure you scroll down to see the other designs! I had so much fun on today's projects and I hope it gives you some inspiration! 


Each of the three cards uses the Mix and Mat: Postal die, of course, which really enhances the entire theme of the cards! For this particular card, I layered three of the die cut pieces using Rustic White cardstock. This created a nice sturdy base so that I could layer all of the die cut pieces onto it. I also knew I would be doing some heat embossing and I wanted to eliminate any warping and the triple thickness was perfect! I purposely chose the "forever and always" sentiment from the With all my Heart mini stamp set because the stamp say "forever" and it really enhanced the postal feeling!

I embossed the sentiment in gold because it is gold on the stamp, of course!  The "love" die cut is stacked four times for a chipboard weight piece. I just love the dimension that it gives to the card. Because the "L" and the "ove" portion are separate, I was able to manipulate the leaves that are stamped using the Stitching Garden stamp set and stamp them here and there just like on the stamp.
I used the Bitty Bouquets stamp set for all of the flowers. I know that there are probably quite a few sets that you could use to achieve the same look as the actual postage stamp, but these were the best fit that I actually own. I used the same colors that are on the postage stamp and got to work stamping and die cutting using the coordinating dies. I actually made two of this same card so I stamped quite a lot of images! I arranged them around and under the Love die to give it some depth and dimension. I added a few sparkling rhinestones here and there for some shine. The whole focal piece is layered onto a piece of Lovely Lady cardstock that has been die cut using the Pierced Rectangle dies.  I also used the Pleasing Envelopes stamp set on all of the envelopes on today's projects! I used different sentiments on each of the envelopes!

My second card for today uses the newly released "LOVE" stamp! This was a last minute addition to my projects because when I went to the post office to purchase the stamps that were the inspiration for my 3rd card, they showed me this one! Of course I had to get some, partly because the stamps are increasing price on the 27th, but mostly because I knew it would make a fantastic card! LOL! I knew that I had just the right supplies to make this and it is just perfect for Valentine's Day!

To begin, I die cut the Mix and Mat: Postal die twice. I was in a hurry since this was a last minute addition, but I knew that it would emboss well if it was doubled. I used the same sentiment as on the previous card but this time I used silver powder based on the actual postage stamp. I loved all of the white space from the stamp, so I die cut the Bold Borders: Love die from white and the "love" portion twice out of Pure Poppy cardstock. I love how closely the words match each other.

I layered the heart frame onto a piece of Hibiscus Burst cardstock which was the closest to the pink in the postage stamp. I die cut three of the hearts from the newly released From the Heart dies from Hibiscus Burst, Orange Zest, and Amethyst Allure cardstock. These are three colors I don't think I would ever put together, so I was happy for the chance!


To finish off this design, I added a few sparkling rhinestones here and there for some additional detail and shine!  I was glad the cute post office lady showed me these stamps because it is a design that I never would have come up with on my own!


This is the third and final card for today's Design Team Tips! This one is a bit of a stinker because I found out AFTER I made it, that this particular stamp has been pulled from rotation and sale! Ugh! I was so bummed out, but I decided to share it with you anyway. You can still find it with some notecards HERE, which is fun!

I used to have quite a few of these stamps, but I guess I used them all up! Oh well...I still actually really like the card! I used the same "LOVE" die for this card as well, but this time just die cut out of white cardstock and layered up 4 times. I created the stenciled cloud background by creating my own stencil using the Cloud Dies. I was going to take a picture of my homemade stencil, but I forgot. Maybe I will add it later if I get the chance! I just placed them side by side, just overlapping slightly onto a piece of cardstock and glued them down. It was easy to just blend the ink just like you would with any edger type stencil.I am really pleased with the end result!

The plane and skywriting are from the Love you to pieces: Airplane stamp set and work so perfectly for this card! I was so happy I had them in my stash for today's design! The sentiment at the top is from the With all my Heart stamp set, which is linked with the first card, and is heat embossed in silver.


The edge of this card is also embossed using the pierced rectangles as well. I love the extra bit of detail it adds to any design! Well, this is the last of my cards for today's Design Team Tips! 
I hope that you have found today's post useful and inspiring in some way! I really had so much fun putting all of the project together! One of my favorite postage stamps that deserves to be recreated is the scratch and sniff popsicle design which you can see HERE. You could use the Colorful Treats stamp set or any other popsicle set that you might have! Anyway, thanks for fluttering by!

P.S Don't forget to buy some stamps before the price hike on the 27th!πŸ˜‰

Keeping Christmas {just a little something} sewn mini stockings


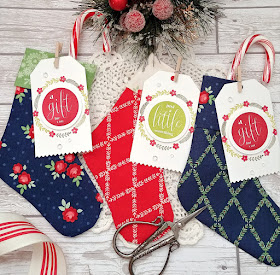
Welcome to the first Keeping Christmas Blog Hop of 2019! Wahoo! I am so excited to get started on Christmas projects for this year! As I was packaging things up this past Christmas, the ideas were swirling and I am so excited about the content that I have planned to share with you this year and I hope you enjoy it as well!  For my project today, I have created a set of 4 sewn mini stockings and coordinating tags! You can find the tutorial for these stockings on my Thimbles and Thread blog HERE. Also, don't forget to head to the rest of the designer's blogs to see what fabulous Christmas inspiration they have for you as well!
Kelly Lunceford (you are here)

Vicki Finger


Nancy Guse

The idea for these tiny little stockings came from a little stocking and tag that my SU! demonstrator gave me this past Christmas! It was absolutely adorable and I couldn't wait to try and make a few myself. I had originally planned on making them using the same fabric I used for THIS project, but as I was getting the fabric prepped, I realized that #1 I didn't want to use it up, because I am a hoarder 😜and #2 the print is quite large and I felt that it would get lost and be too busy for these small stockings. So...a trip to the fabric store was in order. The Christmas selection had been totally picked over and the results were dismal. I decided to just look around for some other prints that inspired me! As coincidence would have it, I was drawn to the same line that I used for THESE projects! 

I really love the look that the crisscross leaves have in these particular fabrics and I knew they would work  perfectly with the Gina K Tiny Wreath Tag builder bundle that I got as a freebie from Simon Says Stamp last December. I was already planning on using this set for the tags, so it was a win/win! Also, I really love how the non Christmas fabrics look for these tiny sewn stockings!

As I mentioned earlier, I have created a tutorial for these stockings which is linked above. I made a total of 4, but for photography purposes,  I  was only able to get 3 to look nice in the photographs.

These stockings actually hold quite a bit of goodies and treats. They are large enough to hold a gift card as well, which I plan on doing.  They are not lined, but I think the cuff adds just the right enough of "extra" cuteness to make up for it. You could definitely line them if you need or want to.

To begin the tags, I die cut 4 out of white cardstock using one of the Tag Sale tags from PTI. I stamped the "just a little something" and the " a gift for you" sentiment circles and punched them out. They are attached to the tags using foam squares for dimension.  

Once that was done, I got to work adding the different foliage images around the circles. I didn't plan these out well enough and ended up with a random hole at the bottom! Ugh! Oh well...I just used another branch and called it good! I was making these all at the same time, doing the same step on each one as I went so I was stuck! LOL! I added a few sparkling clear rhinestones here and there for some shine! I attached these to the cuff of the stocking using tiny clothespins. I tried some twine tied to the clothespins, but it looked to cluttered, so I left them be! These were so easy and simple to make! I'm sure I will be cranking out a few more before too long! Thanks for fluttering by!


Thursday, January 24, 2019

Sending (Lots of Love)


Welcome friends! I'm over on the SugarPea Designs blog today sharing a few Valentine's Day inspired projects! Every year for Valentine's Day I make a batch or two of chocolate covered strawberries! They are so easy and everybody seems to really enjoy them! I package them up on silver trays from the dollar store wrapped with cellophane, ribbon, and a handstamped tag, of course!
I ended by making 6 of the same tag using the Snowflake Tag Sugar Cut for the base. Once they were all cut, I stamped the top of the tag with the stripes from the Christmas Tag Greetings stamp set. Once that was done, I stamped the bottom with the medium bloom from the Pretty Peonies stamp set in black ink. 

The hearts are die cut using the heart die that is included in the Postage Stamp Sugar Cuts . I stamped the flower using white ink and then stamped the Sending sentiment in black over the top. 

I stamped the "lots of love" portion onto white strips and added them to the card using foam squares. A few sparkling rhinestones finish of this set of tags. After I finished, I thought the tag design would look great on a card!

I quickly made one more tag and got to work creating the rest of the elements to add to the card. I always love a card with a tag as the focal point.


The card base is Kraft and I added an additional panel that has been die cut using the Card Front Element Builder . I love the additional bit of stitching detail that it adds to the design.
I used the postage stamp sugar cut to adhere the tag to. I linked it above when I talked about the heart.


I opted not to tie a ribbon or twine through the hole on the tag, but you could definitely add one if you like! Of course the tags for the strawberries will have some pretty ribbon, which I love! Thanks for fluttering by!

Inspired By #56 {You are Awesome}

Welcome to this week's Inspired By Challenge! This week is all about a Football Party, but I decided to take inspiration from some of the other elements included in the photo! Before I dive into the details of my design, you'll want to head over to the Inspired By Blog to see what the rest of the designers have come up with and how the photo inspired them!

As I mentioned earlier, I decided to go a different direction than the "Football party" merely because I have made quite the collection of football cards in my time and I really liked some of the other elements in the photo; the distressed peeling paint in the background, the shiny silver bucket, the stitching on the football and the pennants!

I rummaged around in my ancient stash of SU! paper to find this blue paper I used in the background. I used to have a paper that looked EXACTLY like the peeled paint in the photo, but I guess I used it all up. I really like this distressed blue, so I guess it all worked out!

I hadn't inked up the Banners and Pennants stamp set yet and it worked so perfectly with the look I was trying to achieve! I also used an older set for the actual pennant image. I stamped everything in black except for the embossed images. I wanted to bring in that shine from the metal bucket/cup in the photo.

The Banner Die is die cut using Weathervane cardstock and stamped with the compass image as well as the arrow. I layered it all up onto a Kraft card base to mimic the look of the wooden frames used for the "football plays". Once that was done, I added some zig zag stitching along the lower left edge and the top right edge. I like that little touch to bring in the detail from the football. I scattered some sequins across the front as well as some stamped stars for added interest. I think this design would work nicely for a teen who needs some encouragement! I hope you'll join us this week! Thanks for fluttering by!

Saturday, January 19, 2019

Just {Bee} cause!

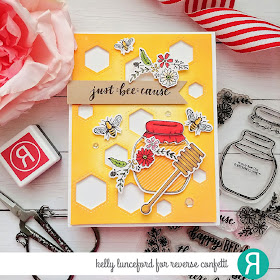
Hi, friends! I'm just buzzing in today to share a "just because" card I created using the fabulous new Happy Bee Day stamp set.  I think it is my favorite from the new release, but it is so hard to pick because there are so many! I guess I can say it's in my top three! LOL! I've needed a "hello" or "thinking of you" or "just because" card for a while now and I just had to keep putting it off because of my other commitments. So...I guess you could say I got to make this "just because"! Ha ha!
Also, it just so happens that there is a 15 % off sale going on over at Reverse Confetti that you want to take advantage of if there are things still on your wish list!

To begin this simple design, I die cut the Hex Cover Panel Confetti Cuts out of white cardstock and did some ink blending using Wild Honey Distress Oxide ink. Once it was blended, I lightly spritzed it with Sparkle Shimmer Spray. I set it aside to dry and got to work stamping and coloring all of the images I wanted to use.

The honey jar was left over from THIS card, which was a plus, so I worked on the bees, flowers, honey dipper, and sentiment. I used Copic markers to color them and used the coordinating Happy Bee Day Confetti Cuts.

Once everything was cut, I added them to the card using foam squares for dimension. A few sparkling clear sequins finish off this simple design.

I had a few die cuts left over, so I decided to do some simple stamping on the inside for a more finished look. This will get popped in the mail today! Thanks for fluttering by!