Tuesday, August 29, 2017

Keeping Christmas {Die cut tags-4 ways}


"I will honor Christmas in my heart...and try to keep it all the year long!" ~Charles Dickens

And now back to our regularly scheduled program...LOL! I had so much fun being a guest for the Verve release this last week! I'm sorry if there were some of you looking for my Keeping Christmas post back on the 25th. I didn't want to bombard you all with any more posts than I already was posting.

 Not gonna lie...this month was rough for me as far as getting my project done. I just kept stressing about it and in the end I had to remind myself that I started this to #1 Have fun #2 Make things that I wanted and needed for this coming Christmas #3 Have fun! LOL! There are quite a few ideas I have that I am planning on executing, but unfortunately they are things that will have to wait until October or November.


Well, to be honest...I don't think I need any more tags but I FINALLY got the Tremendous Treats Die Set. I have had the Stamp Set for YEARS and ended up by not using a lot of the images because I felt they were a little small and I couldn't give them much presence, but with the die cuts it makes it a lot easier to make them a little more special. I die cut each of the images twice, stamped them using Palette Noir ink and then colored them using Copic Markers. I colored them assembly line style by coloring each color on each image as I went along...so, all the red on all the images, all the black, and so on. I like doing it that way so I don't end up with a pile of markers rolling around on my desk.


Once they were all colored, I added some Nuvo Glaze to bits and pieces of each image as well as a generous amount of Wink of Stella. I set them aside to dry while I got to work on the tag bases for each image. I thought it would be fun to use the Fancy Flakes die as the base for some of the smaller images. I really like how they turned out and I like how easy it was to add the twine to one of the open spaces on the snowflake pattern.


After I was done die cutting the snowflakes, I thought it would be cute to emboss the snowflake onto a circle die cut. I like how it has a cohesive feel,but a little more subtle than the tags using the snowflake die cut as the base. To execute this, I used my brown embossing pad in my Cuttlebug that makes it possible to dry emboss with a die cut.

Then...I thought it would be nice to try the die cut snowflake added to the die cut circle to step it up a notch. I really like all of the different ways that I tried for these tags and depending on the time you have, you can tailor it to your needs. The die cut snowflake was by far the quickest, obviously and then they work their way up from there. Each tag base is spritzed with Shimmer spray for some extra shine!


I've used the coordinating sentiments that come with the stamp set forever and for today's tags I thought I would change it up and use the Cozy Critters sentiment set. I really like how nicely they pair up with the different images. They are all stamped in white...some directly on the tag and others on a sentiment strip.


Each tag is tied up with some black baker' twine. I got a HUGE roll half off at Hallmark in July and I have used pretty much the ENTIRE roll. I'm thinking of heading back to see if they have another roll because it ended up being $2.50 for a 25 yard roll. 

My daughter auditioned for Ballet West's production of The Nutcracker and she made it! I am so excited for her! That is part of the craziness of August as well as my 7 year old playing his first year of football and my oldest playing his Senior year of football! Things have been crazy around here to say the least, but it's all fun stuff! Thanks for fluttering by!

Monday, August 28, 2017

Verve's 10th Anni-verve-sary Day 5- a few of my favorites


Welcome back to Day 5 of our Anni-VERVE-sary Spotlight Hops!  It's an exciting day as there's new Verve in the store this morning! 4 beautiful new sets and 2 coordinating die sets just released and they're all available to order right now. To celebrate this special 10th Anni-VERVE-sary release, we're putting on another blog hop, with a pretty cool prize!
Today's featured focus is designer's choice, so you might just sneak a peek at a whole bunch of must-haves, especially since we've got a full line-up of Divas, guests and Alumni today!
Want to win some shiny new Verve? Today's prize is a BIG one. We'll be picking a random commenter on one of the hop spots below to win our ENTIRE new release! So be sure to leave a little comment on all the blogs below to increase your chances! Check out the Verve Blog today for the full hop list and all the prize info and deadlines!
Little OnesLittle Ones Die Set
Bloom BrighterBlooming Die Set
Cake and CandlesScripture Medley 5

Day 5 Hop List
1. Julee9. Lesley
2. Maureen10. Christyne
3. Betty11. Laurie
4. Charmaine12. Kelly (Guest)
5. Marisa13. Laurie W(Alumni)
6. Amy S.(Alumni)14. Tosha L. (Alumni)
7. Amy K.(Alumni)15. Tiffany S.(Alumni)
8. Michelle W. (Alumni)
I'm back today for the final day of the new Verve release. It has been so much fun! I appreciate ALL of your SWEET comments over the last few days! You know how to make a girl's day! Don't forget that you can head over to the Verve site today to purchase these amazing sets. The link to the store is included above! I'm sharing two cards today to finish off the release. This first design is a combination of the "Cakes and Candles" set and the fabulous "Bloom Brighter" set. I seriously love these flowers. They are so easy to use and the coordinating die cuts make them a breeze to create easy embellishments.

For this design, I heat embossed three of the large blooms using white powder onto Bristol paper since I did ink blending. After I heat set them, I blended some distress ink using Peacock Feathers, Raspberry Preserves and the straw color ( I can't remember the name). I just love how the emboss resist looks with these flowers. 
For the base, I blended some more ink onto a piece of Bristol paper. I stamped the black sentiment from the "Cake and Candles" set at the bottom using my MISTI for perfect placement and a saturated image.


The "enjoy today" sentiment strip was heat embossed onto black paper using white powder. I was only planning on using one of the sentiments horizontally, but as I was aiming for the "perfect" embossed piece, I realized how cool it would be to use multiple images across the entire strip. I just love how it turned out. Creating a sentiment strip like this makes it easy to incorporate a smaller image while still using a bold sentiment as well, like I did at the bottom.
I saved this card for the end because it is hands down, one of my favorite sentiment images from Verve. I used it years ago on THIS card that I made for my daughter. I re-read that whole post and I was just laughing! Such fond memories...
To begin, I sponged some Antique Linen distress oxide ink onto some Bristol paper. Once that was done, I heat embossed the sentiment with white powder onto a circle of Bristol paper and then used Peacock Feathers distress ink to blend over the top. 

I adhered the stenciled background onto a Kraft A2 card base and added a strip of bitty dot patter paper on the side. The black twine is threaded through a punched hole on the fold of the card and then tied in a bow. The circle sentiment piece is added to the card front using foam squares.
I love that the coordinating die set includes the heart. I die cut it 5 times out of white cardstock and then stamped one of them with Candied Apple distress oxide ink. I stacked them using Tombow Mono and added some Nuvo glaze over the top for some shine. A few sequins finish this simple design off. Once again, I had so much fun being a guest for this release! Thank you, Julee! I love my stamping friends so much!!! I am so grateful for the friendships I have made over the years that have continued even though I have been "missing" for a few (or more) years! I think that sentiment fits perfectly with how I am feeling! Thanks for fluttering by!!!

Sunday, August 27, 2017

Verve's 10th Anni-verve-sary Day 4-Scripture Medley 5

Welcome to Day 4 of the Anni-VERVE-sary Spotlight Hops!  It's time for another day of spotlighting the Verve release with the Verve Divas and special guests! We're super excited to have another very special Diva Alumni joining us for the hop today. Everything previewed this week will be available to order in the Verve online store on Monday, August 28. If you know you want it all, today is the final day to pre-order the August 2017 Buy it All Bundle at a 30% discount! Only one more sleep until release!
Today we're sharing our first projects featuring the Scripture Medley 5 stamp set. This set includes the re-introduction of the final 2 scripture plain janes, as well as 9 all new scripture verse stamps.
Want to win some shiny new Verve? We'll be picking a random commenter on one of the hop spots below to win today's featured products! So be sure to leave a little comment on all the blogs below to increase your chances! Check out the Verve Blog today for the full hop list, a little more about our new products and all the prize info and deadlines!
Scripture Medley 5

Day 4 Hop List
1. Julee6. Tiffany S. (Alumni)
2. Maureen8. Lesley
3. Betty10. Christyne
4. Charmaine11. Laurie
5. Marisa12. Kelly (Guest)
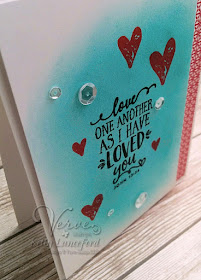
I'm so excited to be back today to share a few cards for today's featured stamp set; Scripture Medley 5! There are so many amazing scriptures! They are the perfect combination to create all kinds of cards to send for encouragement, love, service and more! I just love it! I am also loving the hearts that are included in the set as well. They are the perfect addition! In the card above, I used some oxide inks and did some watercoloring with them. The heart  and coordinating die are included in the Little Ones set that was showcased on day one of the hop. It is such a simple design, but I really like how it turned out.
I'm a sucker for anything bee related so I couldn't wait to use this particular scripture. I paired it with the previously showcased floral set from earlier on Day 2. Once again, I watercolored the flowers. They are really addicting to use and embellish with.

This final card for today features the hearts in varying sizes. I really love how easy it is to get a nice arrangement with these. The background is blended using distress inks, but the red hearts are stamped using oxide ink for a nice, saturated, creamy look.

A few sequins and a strip of red pattern paper finish this card off making the sentiment the main focus! Very simple! Join me tomorrow as we wrap up the release! Thanks for fluttering by!

Saturday, August 26, 2017

Verve's 10th Anni-verve-sary Day 3-Cake and Candles

Welcome to Day 3 of the Anni-VERVE-sary Spotlight Hops!  It's time for another day of spotlighting the Verve release with the Verve Divas and special guests! We're super excited to have a couple very special Diva Alumni joining us for the hop today. Everything previewed this week will be available to order in the Verve online store on Monday, August 28. If you just can't wait, you can pre-order the entire release now as the August 2017 Buy it All Bundle at a 30% discount through August 27.
Today we're sharing our first projects featuring the Cake and Candles stamp set, another fusion of old and new. This birthday themed compilation includes some brand new birthday sentiments with a classy modern font pairing, as well as a few re-introductions of previous sentiments and plain janes.
Want to win some shiny new Verve? We'll be picking a random commenter on one of the hop spots below to win today's featured products! So be sure to leave a little comment on all the blogs below to increase your chances! Check out the Verve Blog today for the full hop list, a little more about our new products and all the prize info and deadlines!
Cake and Candles

Day 3 Hop List
1. Julee7. Lesley
2. Maureen8. Christyne
3. Betty9. Laurie
4. Charmaine10. Kelly (Guest)
5. Marisa11. Michelle W. (Alumni)
6. Tosha L.(Alumni)
Welcome to day THREE of the 10th Anni-verve-sary for Verve Stamps! I'm having so much fun and I'm so honored that Julee included me on this amazing milestone! She's a rockstar! I'm so beyond proud of her! With that being said, let's get on with the projects for today that showcase the fabulous new "Cake and Candles" set! You can't ever have too many birthday sentiments and this one is sure to become a fast favorite! 
 I actually chose to create a non-traditional birthday card and in all reality, it doesn't even need to BE a birthday card because the sentiment can be used for a generic thinking of you design. I felt like creating something with an organic vibe to it. I think it was those little ferns that got to me again. They are included in the stamp set that was showcased yesterday if you'd like to scroll down to yesterday's post.  Such a sweet little image but it really can pack a punch when it is used in the right way. To begin, I created this background using distress oxide ink and a stencil. I really like how it came out. From there, my mind's eye needed some corrugated Kraft paper. So....I dusted off(literally) the old paper crimper and got to work. I can see my crimper getting a little more attention in the future, too. I used to use it quite a bit.


It created the perfect backdrop for the focal sentiment piece that I turned into a tag by adding an eyelet and some hemp. I diecut a trio of the fern images and scattered them across the card. I matted the corrugated panel onto a piece of black paper for some added contrast.
 My next design showcases a more traditional use of the set as well as a fun, rainbow stenciled background. It was created using an assortment of oxide inks and a stencil. I trimmed it down slightly to fit onto an A2 card base. 
 I stamped the cupcake image onto white paper and then colored it using copic markers. After that was done I punched it out with a circle punch and adhered it to a black  piece of paper that the sentiment had been heat embossed onto previously. The finishing touch is an assortment of rainbow sparkle gems for some shine. I couldn't resist putting one as a cherry on top of the cupcake. 
This last card is a quick one that I decided to make last minute because I just HAD to use this fun saying with the cupcakes! It is a shaker card, but in the end, I didn't add enough sequins. boo hoo! Oh well! It's still cute and gets the point across. I created the windows using square die cuts and then used my MISTI to line up the cupcakes perfectly! They are colored with copic markers and then a litte wink of stella for shine! Thanks for fluttering by!

Friday, August 25, 2017

Verve's 10th Anni-verve-sary! Day 2-Bloom Brighter


Welcome to Day 2 of the Anni-VERVE-sary Spotlight Hops!  It's time for another day of spotlighting the Verve release with the Verve Divas and special guests! We're super excited to have a few very special Diva Alumni joining us for the hop today. Everything previewed this week will be available to order in the Verve online store on Monday, August 28. If you just can't wait, you can pre-order the entire release now as the August 2017 Buy it All Bundle at a 30% discount through August 27.
Today we're sharing our first projects featuring the Bloom Brighter stamp set and coordinating, Blooming Die Set. A fresh take on the flower from the retired commemorative set Beautiful You, this beautiful encouragement set is perfect for a vareity of cardmaking occasions.
Want to win some shiny new Verve? We'll be picking a random commenter on one of the hop spots below to win today's featured products! So be sure to leave a little comment on all the blogs below to increase your chances! Check out the Verve Blog today for the full hop list, a little more about our new products and all the prize info and deadlines!
Bloom BrighterBlooming Die Set

Day 2 Hop List
1. Julee7. Amy K. (Alumni)
2. Maureen8. Lesley
3. Betty9. Christyne
4. Charmaine10. Laurie
5. Marisa11. Kelly (Guest)
6. Amy S(Alumni)12. Laurie W(Alumni)
ETA: if you've come looking for my "keeping Christmas" post, it will be postponed until Tuesday after the Verve blog hop! Welcome back! Once again, I've gotten carried away with samples! I really enjoyed experimenting with these new sets! These flowers are so fun to play with. For this first card, I heat embossed the largest flower using white powder onto watercolor paper. I watercolored them using an aquapainter and ink refills. Watercoloring over embossing is one of my favorite techniques and is so easy to do. 

Once they were dry, I die cut them and adhered them to a panel of vellum using foam squares. The sentiment is stamped in white onto the vellum as well. I contemplated heat embossing it so it would show up better, but I didn't want the vellum to warp so I left it. I actually wanted a soft look, so I am happy with the result and in person it is more visible. The vellum is adhered to a soft stone card base and I used adhesive behind where the flowers are. The finishing touch is Duck Egg Nuvo Drops here and there. They are the perfect color!

My next card is a companion to the first card in color and feel. I really liked watercoloring those flowers, so I decided to try it as a background. I really like the result.The sentiment is once again stamped onto a vellum strip and then wrapped around the watercolor focal panel. The entire piece is adhered to a soft stone card base. I wanted to give a nod to the classic tissue paper that every Verve order comes wrapped in! I just love the blue and silver! 
This next design adds in the solid floral image that I embossed in gold mixed with the watercoloring of the larger bloom. I just love how they work together. To get started, I created a watercolor panel using blues and pinks. I really like how it turned out. That is what is fun about using watercolors; you never really know how it is going to turn out. Sometimes you're hating it right before you fall in love! LOL!
I heat embossed the both the solid and line images using gold embossing powder and then watercolored them as I did in the first two cards. Like I mentioned before, I really like using this technique. I heat embossed one of the amazing sentiments onto the middle of the watercolor panel using the same gold. I REALLY like the brushstroke sentiments included in the set. I can see myself reaching for them often.
The flowers are arranged in clusters on two corners of the card and then I used my paper trimmer to square everything up. Tip for the day: when cutting watercolored panels, it best to cut it by turning it upside down. You get a sharper cut that way, especially if you're impatient and the panel hasn't dried completely. (wink) I added quite a few gold nuvo drops to add in some extra detail, but I really wanted the sentiment and flowers to be the main attraction!
The final project for today showcases how easily you can create a large focal image by using one tiny stamp. I thought the little fern-like image included in the set could make a great wreath...and I was right! It is the perfect frame for one of the fabulous sentiments. Thank for joining me today and thanks for fluttering by!