Sunday, June 28, 2015

Hello There

I decided to get a little creative today and make my own faux "Stacked Sentiments". I was super tempted to buy that set when it came out, but when I looked at it, it seemed like it was just more of what I already have. I really liked the idea of it, so I got to work using the supplies I already have to make my own version. I used the "Oval You've been framed" mini stamp set as well as the uppercase alphabet dies from PTI. They were just the right size for all of the leaves and flowers included in the set. 
 My color palette was inspired by a primitive sampler type look. I got to work die cutting the letters and then stamping the leaves and flowers. Aren't they sweet? I wanted to give them a little more bang for their buck, so I diecut the "ocean tides" piece for a nice background.  The "there" die cut piece was from the new "scripted" die that I just love. I can tell these will be used often.
 I love the use of black for a striking background so I made a little banner piece to anchor the focal image. The mustard paper was dry embossed using a cuttlebug embossing folder. I really like the subtle detail that helps make the whole design pop. The finishing touch was a spritzing of chalkboard ink onto the entire front panel using an American crafts chalkboard marker and my color spritzing tool. I love how it turned out and I am sure that little marker will be dry in no time if I keep using it like that.
I popped everything up for some extra dimension. I can't wait to try making other words in this way. Thanks for fluttering by!

Friday, June 26, 2015

YOU {deserve the very best}

 Ack! I didn't think I would be gone so long! I have been wanting to be creative but my kid's summer schedules are insane! I did make a few Father's Day cards but didn't get them on the blog. 
 A few weeks ago I got out my "Rose Garden" candle from Bath and Body Works that I have had for a few years. The design on the outside inspired me for today's design. It has gold embossed roses with loose water coloring that I just love.The roses from the SU! set "5th Avenue Floral" were an almost identical match. I colored the roses in pink and then I added some turquoise for a nice cool and soothing background and it is also one of my favorite color combos. I watercolored the roses and the background and then used the color spritzer tool and a "Taken With Teal" marker to add some spritzing. I added a wash of water hoping that the speckles would spread but it didn't work as well as I hoped. I still like the result, though.
The "you" sentiment was diecut using gold card stock. I then heat embossed the other sentiment onto a strip of black paper using detail white embossing powder. The finishing touch was a few gold sequins and a bow of black twine. I really hope the recipient is cheered by today's design. Thanks for fluttering by!

Wednesday, June 17, 2015

With Sympathy

 I love working in my yard/garden as much as I love paper crafting so I decided to combine those loves into a nice floral piece today. I needed a sympathy card and a nice watercolor floral is the perfect starting point. Today's card is soft and muted with a touch of yellow to both soothe and cheer the recipient.
 I started by heat embossing the marigold image from PTI's "Year of Flowers" set using detail white embossing powder. Once that was done I got to work watercoloring the image. While Marigolds are much more vibrant in real life, I really achieved the softness I was looking for by using the white embossing powder as well as quite a few shades of yellow ink. I really like how it turned out. I also added some green to the leaves and a nice blue around the entire image to make it pop. I repeatedly stamped the "marigold" sentiment using soft snow ink on Kraft cardstock for a bit more detail. The "with sympathy" sentiment is from "Mega Mixed Messages". I love that set...it always comes in handy!

I turned the focal image into a tag by clipping the corners and adding a a few circle punches for reinforcers. A bit of button twine, gold sequins, doily and machine stitching finish it off for a simple, yet elegant design.

Tuesday, June 16, 2015

Hello, Friend!

My creative space has been beckoning for me to come and play. I heeded the call and got to work on a little "hello" for someone who I think really needs it. The other night I couldn't get to sleep because I kept thinking of gold embossed leaves...I know, crazy! Sometimes a creative mind really gets in the way of a good nights sleep, at least that is true for me! Does anyone else have that happen? Anyway, I sat down and just decided to play around with gold embossed leaves. My first attempt ended up in the circular file and this one almost did as well. I am glad I was able to salvage it and in the end I am quite pleased with the result.
 Once the embossing was done, I just played around with different flowers and blooms, here and there. I added in a little bit of water coloring around the flowers and embossed leaves for some added depth and movement.  The "hello" sentiment was diecut out of foil cardstock. The last time I photographed this particular sentiment in gold on a card, it had a blueish tint to it, probably a shadow from my shirt, but I ended up really liking the look. I decided to add a little acrylic paint over the top with a dry brush just around the edges. I even tried to keep the brush strokes in it for some added detail and whimsy. I really, REALLY like how it turned out and will probably keep applying to different pieces.
I am still loving these curved sentiments as you have probably seen me do in the past. I thought it worked well with today's design.  The last bit of frill was to add a few gold sequins here and there to tie in the rest of the gold. I added a bit of washi tape and some machine stitching to the bottom as well. Thanks for fluttering by!

SUPPLIES:
Brushed Blooms stamp set-PTI
Hello diecut-Little Yellow Bicycle
Versamark Ink
Gold Glory embossing powder-SU!
Blue Acryic craft paint
Stamper's Select cardstock-PTI
Blush Blossom cardstock-SU!
Regal Rose cardstock-SU!
Ink: Rose Red, Taken with Teal, Blush Blossom, Regal Rose, Pink Passion (all SU!)
You've Been Framed-Oval Die-PTI
Watercolor brush and water
gold sequins
embossing gun
washi tape-blue is Scotch Brand, Numbers are from the Creative Co OP
sewing machine and tan thread
foam tape
black marker for the flower centers

Saturday, June 13, 2015

Thanks, Teacher!

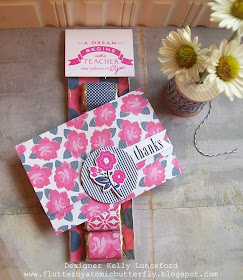
 Today is the last day of school! Yipee! By the time you'll be reading this, summer vacation will be in FULL swing! I wasn't planning on doing any end of year gifts, but guilt and tradition crept in and so here we are! LOL! I decided to keep it simple, yet thoughtful.
 I ran to the store, picked up a couple bags of Hershey's Nuggets and a few multi packs of $10 Applebee's gift cards and got to work.  I decided to sway from traditional apples and stereotypical colors and make something a little bit more modern. I chose to use my pink and navy paper pad for the entire ensemble. 
 I cut strips of pattern paper into 1 inch by 2 3/4 inch strips and wrapped them around each candy. Once that was done, I slipped them into a pretzel cello bag. I slid a larger print pattern paper into each bag to serve as a background for the cute little chocolates. I made a simple topper using the "Teach and Inspire" stamp set from PTI. It is the perfect sentiment and it is already "styled" so it was perfect for this project! It was stamped in Pink Passion ink which is a nice match for the paper.
You can see the different papers that I used here. They are so cute! These would make darling birthday or wedding favors as well. 
I really wanted to make pillow boxes for the gift cards, but the pattern paper was a smaller pad, so I had to make some gift card holders. The size of the paper was perfect, however, and I didn't have to trim it at all! I did a few score lines and used some adhesive and I was done with the assembly. For the embellishment, I used the new "Bitty Bouquets" stamp set and dies from PTI.. I used one each of the four images. The paper is such a light weight that I was able to make it just "tuck" into the circle piece so I didn't need to use any adhesive or velcro. Easy Peasy! No more assignments, no more deadlines, no more projects! Let summer begin!!!!!! Thanks for fluttering by!
P.S. I am toying around with the idea of starting yet ANOTHER blog. Stay tuned for the possible debut!

Wednesday, June 10, 2015

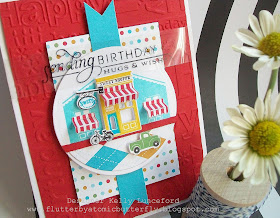
{Sweet}Birthday Hugs and Wishes!

 I had a lot of fun making this sweet shoppe scene for a friend's birthday card.  I was giving her a gift card to the movies in a big popcorn tub with candy. The popcorn tub with its big, bold red stripes was the starting point for this card. I knew I would be using yellow and red, but didn't want it to have a "McDonald's" feel.  I decided to pull in a little turquoise and green to make it bright and fun, but also coordinate with the gift.
 I die cut all of the pieces using the "Sweet Shoppe" die cuts and then got to work stamping everything. The actual Sweet Shoppe was popped up while the other two buildings are just the side panel images from the stamp set and are stamped directly onto the circle. Aren't the red awnings so fun? I also added in a truck from the new "City Station" set as well that I recently got. 
 The sketch is kindof from a Mojo Monday sketch a few weeks back. When I originally looked at it, I knew it work well for one of these scenes, but when it was time to make the card, I was too lazy to look it up! LOL! Julee always does such a good job, though!  The sentiment is from PTI's "Stylish Sentiments: Birthday" and is one of my main go-to birthday stamp sets. I stamped it onto a piece of acetate using Black StazOn ink. It was then wrapped around the card and secured with glue dots.
The patterned papers that I used are super old from SU!  but they had all of the colors I was looking to use. I only have scraps left, so I can't remember or check what it is called. I had a lot of fun with this card. Thanks for fluttering by!

Sunday, June 7, 2015

You're AMAZING!

 In my last post, I mentioned that I needed some thank you cards for the ladies that helped with Teacher Appreciation Week. I needed one to be EXTRA special for an extra special person who is AMAZING! She worked on the tedious task of asking businesses to donate all of the free goodies to our teachers and she ROCKED! She did such a good job! It something that I did last year and really disliked almost every minute of it, so for her to do it, meant a lot to me! Since our theme was Superheroes I thought I'd make her a Superhero card.
 I ordered this stamp set from My Favorite Things during Teacher Appreciation Week. Unfortunately, it didn't arrive in time so it has just been sitting. I was excited to get it inky today and work on some coloring. I chose some traditional super hero colors and used my Copic markers to get her all pretty! I really like all of the sentiments and versatility that this set offers. I am excited to try some other fun things soon.
 Once she was all colored and in her die cut mask, I got to work on the rest of the card. OH....before I forget...I don't actually have the die for this particular stamp set, but I used the mask die cut from the boy version and the mask fits her nicely.  I used a few strips of the PTI comic book pattern paper. The top portion was stamped using the city skyline image that comes with the set. I added a little bit of yellow copic marker to mimic the look of the city aglow. 
I heat embossed the white sentiment using detail white embossing powder onto black cardstock. The "you're" portion was just stamped onto white paper using black ink. I like the graphic, comic book quality that it has. Perfect for today's design.
 I really wanted to use the Superhero emblem image but it wasn't going to work for the front. I simply stamped it, trimmed it and added it to the inside with a fitting sentiment. I also added a tiny silver star sequin for added detail.
 You can see her all ready for some serious super hero action here. I also added a few star sequins to the skyline as well as the focal image.
I had originally started with a watercolored background,but set it aside and didn't use it. When I was cleaning up, the blue watercolor portion was just sitting there and I thought it might look good as stars. I added them later. What do you think? With the stars or without? I kind of like the effect they give the card. Thanks for fluttering by!

Thursday, June 4, 2015

Graceful Thanks

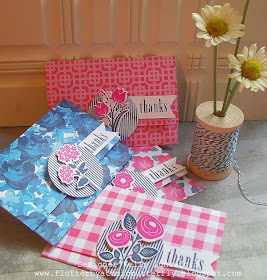
 One of the main reasons why I wanted "Graceful Greetings" was so I could create fast, simple, yet elegant cards. I needed 8 Thank You cards for all of the ladies who helped me during Teacher Appreciation Week and I was tempted to just go and buy some. Does that seem like something I would do? I mean, really....what was I thinking?!? Fortunately, my PTI order arrived just in time to save me from my temporary lapse in sanity! 
 I quickly scored and cut all of the card bases and set those aside.  I knew I wanted to used these scrumptious papers from Heidi Swapp's "Sugar Chic" line. I cut 4 each of 2 designs. Once I had the paper strips applied to the bases, I got busy stamping. I chose all of my colors based on the colors from the floral piece. 
 They all worked up so quickly and I was done before I knew it. I knew I wanted a strip of gold glitter on the pattern paper and that is really what took up the majority of the time, but all of that shine is DEFINITELY worth it! 
 I added 3 gold sequins to each of the cards. I wanted the cards to have a "boutique chic" feel and I think all of the tiny details deliver.
Here they are; all ready to be mailed. I also love that they are nice and flat and won't require any extra postage, but I didn't have to sacrifice style. Now I want to make an all occasion card set with each of the sentiments that are included in the collection. Wouldn't that make a lovely gift? I think so. I would love to receive something like that. Thanks for fluttering by!
Monday, June 1, 2015

{Thanks} for making me smile!

 My daughter asked me why I keep making cards if I don't have anyone to give them to. I laughed and told her that every card I have made for the last year or more has had a recipient. It just seems like lately I have been needing quite a few. This particular card is a thank you for my sister. She gave me the cutest Mother's Day card and this was inspired by it. It was done in navy, pink and gold and was absolutely adorable. I wanted to thank her for the Mother's Day gift as well as all of the Easter goodies she gave my family.
 I used the new "Bitty Bouquets" set from PTI for the focal image as well as the coordinating dies. The "thanks" die cut is one I picked up at Hobby Lobby. The "for making me smile" portion is from an old SU! set and worked out perfectly for this design.  The images were stamped in navy and pink passion and then a few of the flower centers have a tiny dot of gold stickles. The "Thanks" die cut was cut out of an adhesive foam sheet. I sprinkled gold glitter over the top for some high shine.  The rest of the sentiment was heat embossed with gold embossing powder.
A few gold sprinkles finish it off! Sweet and Simple! Thanks for fluttering by!